Blog
Should I Lease or Purchase Solar?
A new federal law ends the 30% solar tax credit in 2025. Install now to maximize your savings before it’s too late!
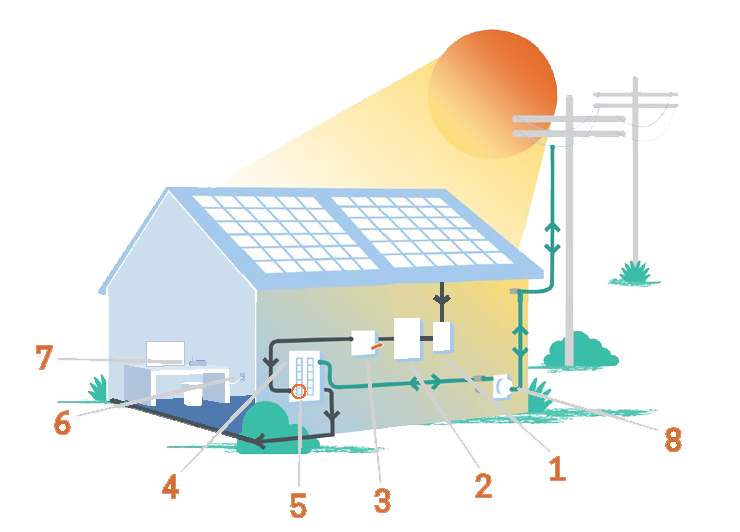
Collects multiple strings of PV
modules and combines them
in parallel
Converts the DC power coming
from your array to AC power before
it reaches your home
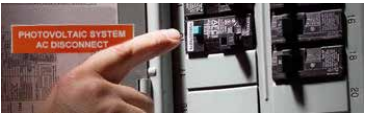
Safety feature to turn off AC (grid)
power before it reaches your
Main Service Panel
Also called a “Breaker Box” - this controls
power from the grid and your array to
the individual circuits of your home
Switches located at the bottom of the
Main Service Panel that turn off the
power to your array
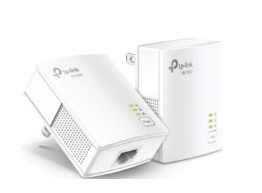
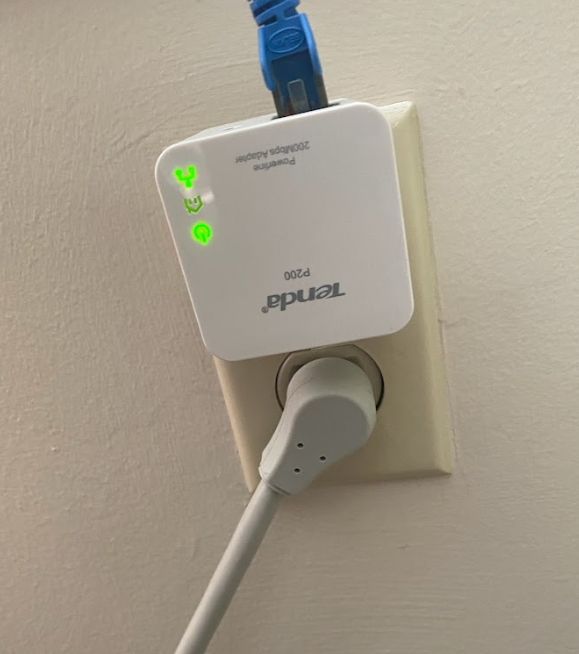
Hardwired internet connection cable,
likely located near your router
and/or inverter
Wireless internet connection device,
likely located near computer
Device that reads incoming and
outgoing power to and from the grid
and your home


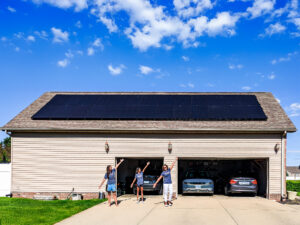
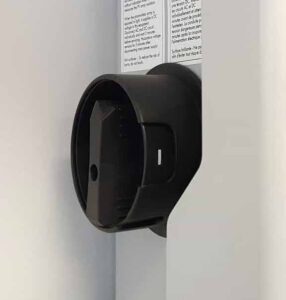
Are you seeing a “Gateway Not Reporting” error in your Enphase app? First, locate your Enphase Gateway. The Gateway is the communications device that collects information about your system’s performance and transmits that information over the internet to the MyEnlighten portal. Your Gateway may be in your utility room, garage, basement, on the outside of your home, or near your home’s electrical circuit breaker panel (Main Service Panel) or sub-panel for your array.
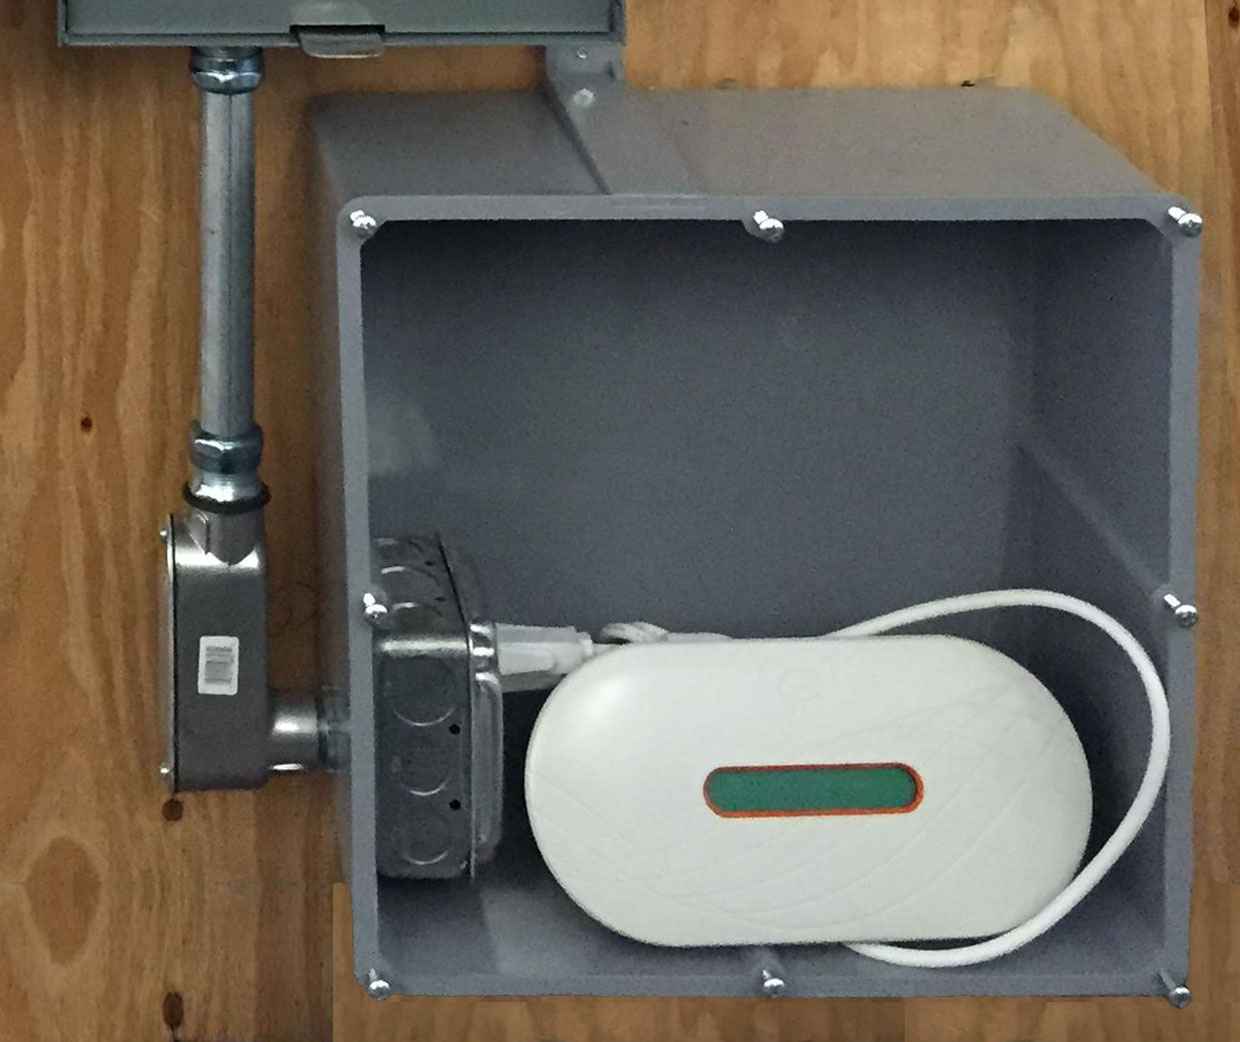
Your Gateway may be in a water-tight enclosure, frequently called the Enphase Combiner Box. If you open the enclosure, you will find the Gateway inside – it may be installed sideways. There are several versions of the Gateway – click on your model for further instructions:”


Still can’t find your Gateway? Please let us know and we can help!
If after following these instructions, you still see a Gateway Not Reporting error, please contact our Service Department for additional assistance.
Please visit the Enphase Support page to determine how your system is connected to the internet and follow the troubleshooting steps provided.
If after following these instructions, you still see a Gateway Not Reporting error, please contact our Service Department for additional assistance.
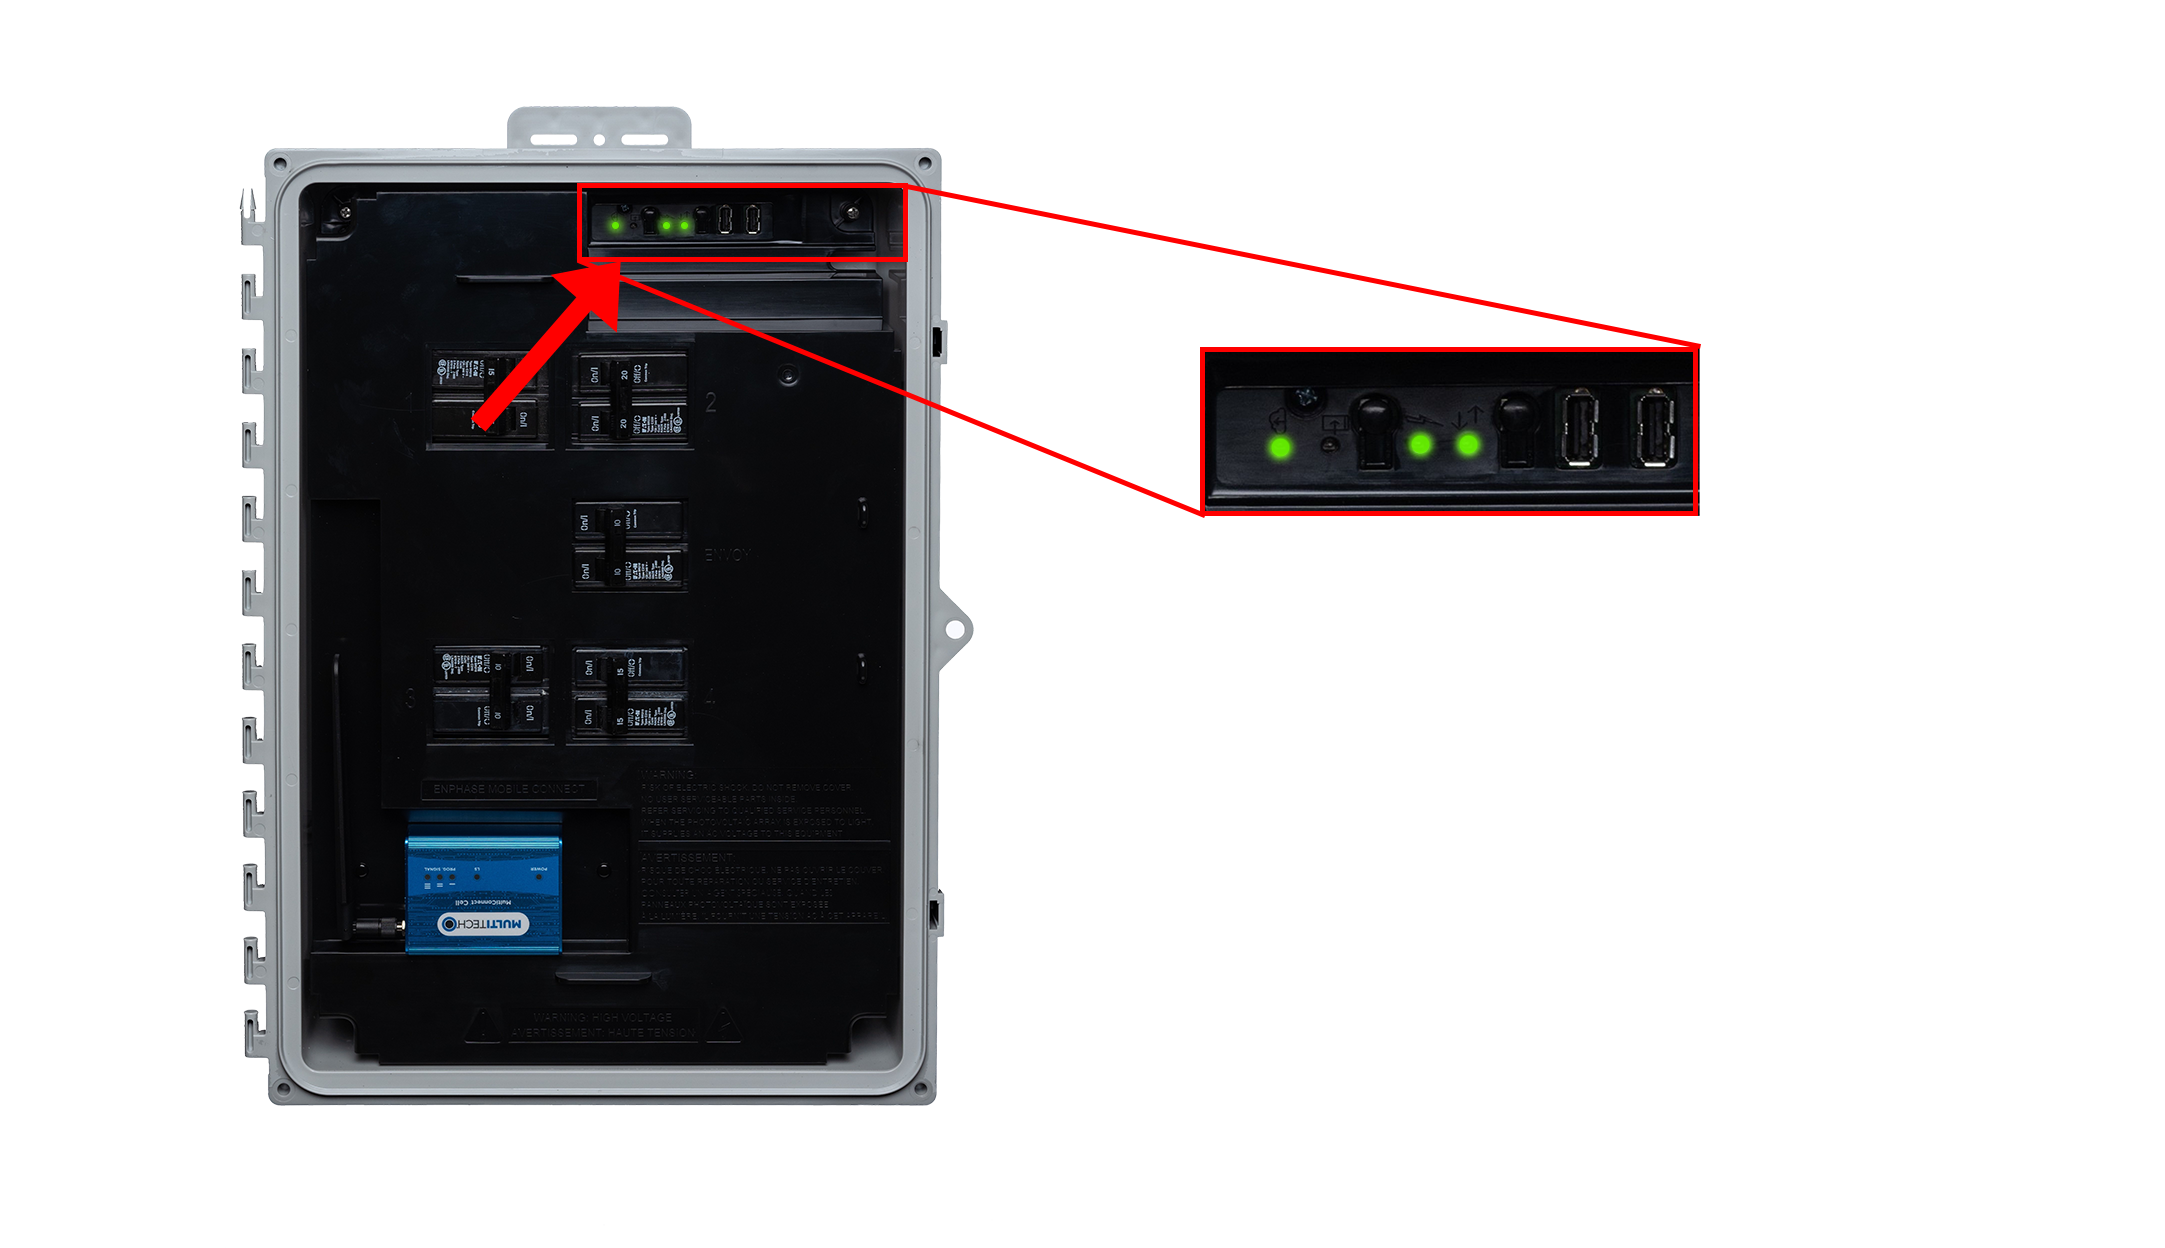
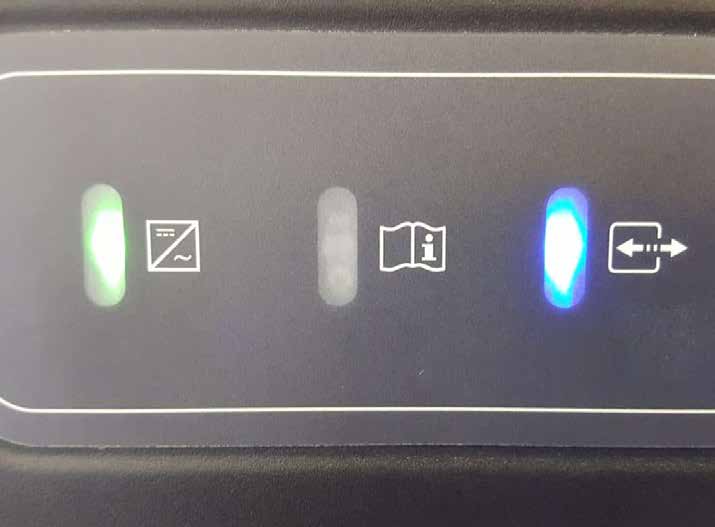
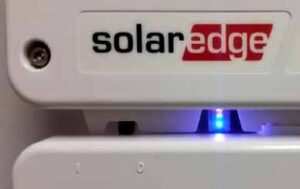
Please visit the Enphase Support page to determine how your system is connected to the internet and follow the troubleshooting steps provided. Here is what the IQ Combiner will look like when it is successfully reconnected:
If after following these instructions, you still see a Gateway Not Reporting error, please contact our Service Department for additional assistance.
Follow these directions from Enphase
Please check to make sure your AC disconnect is in the Up/On position (#3 on the interactive graphic at the top of this page).
After adjusting your breakers and/or AC disconnect, it may take 30 minutes for the issue to be resolved on the Enphase Enlighten monitoring portal. If the “Microinverter Not Reporting” status remains after completing this troubleshooting step, please contact our Service Department for additional assistance. Please also take a clear photo of the LED status lights – our Service team may need this information to help diagnose the issue.
Please check to make sure your AC disconnect is in the Up/On position (see #3 on the interactive graphic at the top of this page).
After adjusting your breakers and/or AC disconnect, it may take 30 minutes for the issue to be resolved on the Enphase Enlighten monitoring portal. If the “Microinverter Not Reporting” status remains after completing this step, please contact our Service Department for additional assistance. Please also take a clear photo of the LED status lights or LCD screen (Envoy R) – our Service team may need this information to help diagnose the issue.
The ‘Microinverters Not Reporting’ system status sometimes displays when the Gateway is too far from the home’s main service panel or because of interferences in the power lines between the microinverters and the Gateway. Usually, this is an issue you can address on your own and should not require an onsite visit. For more information on these instructions, go to the Enphase Support webpage.
Step 1: Locate your SMA inverter.

Step 2: Turn off the AC Power.

Note: If the solar circuit breaker is not labeled, look for a dual pull 40 AMP breaker toward the bottom of the main service panel that might look newer than the others. This is likely the solar breaker.
Step 3: Leave everything off for 10 minutes.
Leave the AC and DC power completely off for 10 minutes. This will allow time fo the capacitors in the inverter to discharge completely before proceeding to the next step
Step 4: Turn on the AC power.
Flip the AC solar breaker back into the ON position. Make sure it matches the direction of the rest of the breakers in the main service panel.
Step 5: Turn on the DC power.
Turn the DC power back into the ON position by turning the dial/knob ¼ turn to the right.

Note: if red light remains on and/or a 4-digit code remains on the inverter screen, please document this (photos work great) and contact our Service Department for additional assistance.
Step 1: Locate your SMA inverter.
Step 2: Turn off the AC power.
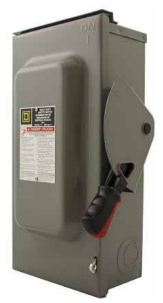
Locate the AC Disconnect to turn off the AC power. The disconnect is often located outside near the meter. Pull the handle down into the OFF position.

Step 3: Leave everything off for 10 minutes.
Leave the AC and DC power completely off for 10 minutes. This will allow time fo the capacitors in the inverter to discharge completely before proceeding to the next step
Step 4: Turn on the AC power.
Lift the AC disconnect handle up into the ON position.
Step 5: Turn on the DC power.
Turn the DC power back into the ON position by turning the dial/knob ¼ turn to the right.
Note: if red light remains on and/or a 4-digit code remains on the inverter screen, please document this (photos work great) and contact our Service Department for additional assistance.
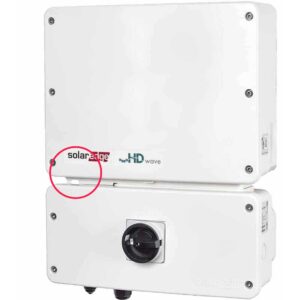
When there is a green light on your inverter but there is a “No Communications” alert on your online SolarEdge/mySolarEdge monitoring portal, please see the following guidance to help re-establish your internet connection:
Step 1: Confirm that the internet is working properly on your computer. If not, please contact your Internet Service Provider to help re-establish an internet connection.
Step 2: Confirm your inverter is properly connected to your router and that your router is properly connected to the internet. To do this, determine which of the following connections is applicable for your solar system setup and follow the provided guidance.
Step 3: If the problem persists, reset your internet router. If none of the above solutions seem to correct your inverter’s internet connection, reset your router: unplug the router from the wall outlet – wait 30 seconds – plug the router back in.
Have you changed Internet Service Providers (ISP) or installed a new router lately?
Step 1: Begin powering down the inverter.
Note: In some SolarEdge models, the toggle has three different options. Push the toggle to the “0” position.
Step 2: Turn off the DC power.
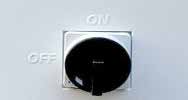 Find the black or tan dial/knob – it will be located on the front of the inverter, left side of the inverter, or below the inverter.
Step 3: Turn off the AC power.
 Note: If the solar circuit breaker is not labeled, look for a dual pull 40 AMP breaker toward the bottom of the main service panel that might look newer than the others – this is likely the solar breaker.
Step 4: Leave everything off for 10 minutes.
Leave the AC and DC power completely off for 10 minutes. This will allow time for the capacitors in the inverter to discharge completely before proceeding to the next step.
Step 5: Power the system back ON.
Repeat all of the previous steps in the opposite order:
You may hear clicking sounds as the inverters power back up – this is normal. It will take up to 15 minutes for the inverters to cycle all the way back on. For screenless inverters, all three LED lights will turn on and remain solid for a brief time. The three colors are:
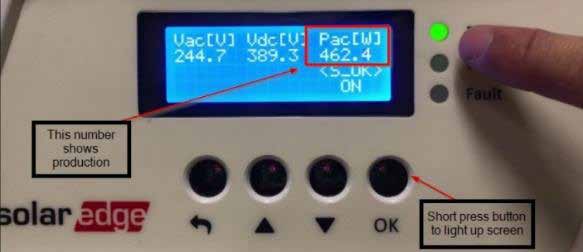
Step 6: Verify production.
After 15 minutes, check the LED indicator located in-between the cabinets of the inverter.
 Green light (Production) will stay solid
*If the red light remains on and/or a code appears on the inverter screen, document this and contact our Service Department for additional assistance.
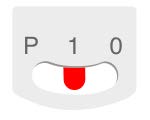
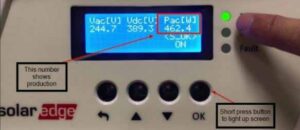
If your inverter has a screen, a short press of the rightmost button will “wake up” the screen. If you see a number below the “Pac”, solar production is taking place.
If the sun is shining, the online SolarEdge portal should begin to show data within 1 hour.
Step 1: Begin powering down the inverter.
Note: In some SolarEdge models, the toggle has three different options. Push the toggle to the “0” position.
Step 2: Turn off the DC power.
Find the black or tan dial/knob – it will be located on the front of the inverter, left side of the inverter, or below the inverter.
Step 3: Turn off the AC power.
Locate the AC Disconnect to turn off the AC power. The disconnect is often located outside near the meter. Pull the handle down, into the OFF position.
Step 4: Leave everything off for 10 minutes.
Leave the AC and DC power completely off for 10 minutes. This will allow time for the capacitors in the inverter to discharge completely before proceeding to the next step.
Step 5: Power the system back ON.
Repeat all of the previous steps in the opposite order:
You may hear clicking sounds as the inverters power back up – this is normal. It will take up to 15 minutes for the inverters to cycle all the way back on. For screenless inverters, all three LED lights will turn on and remain solid for a brief time. The three colors are:
Step 6: Verify production.
After 15 minutes, check the LED indicator located in-between the cabinets of the inverter.
Green light (Production) will stay solid*If the red light remains on and/or a code appears on the inverter screen, document this and contact our Service Department for additional assistance.
If your inverter has a screen, a short press of the rightmost button will “wake up” the screen. If you see a number below the “Pac”, solar production is taking place.
If the sun is shining, the online SolarEdge portal should begin to show data within 1 hour.
When there is a green light on your inverter but there is a “No Communications” alert on your online SolarEdge/mySolarEdge monitoring portal, please see the following guidance to help re-establish your internet connection:
Step 1: Confirm that the internet is working properly on your computer. If not, please contact your Internet Service Provider to help re-establish an internet connection.
Step 2: Confirm your inverter is properly connected to your router and that your router is properly connected to the internet. To do this, determine which of the following connections is applicable for your solar system setup and follow the provided guidance.
Step 3: If the problem persists, reset your internet router. If none of the above solutions seem to correct your inverter’s internet connection, reset your router: unplug the router from the wall outlet – wait 30 seconds – plug the router back in.
Have you changed Internet Service Providers (ISP) or installed a new router lately?
Before you begin, follow the steps below to check and confirm that all of your solar system’s components are activated and showing power.
If everything is properly powered on, you can proceed with a system reset, called a Powercycle. Most inverter challenges can be corrected with these Powercycle steps.
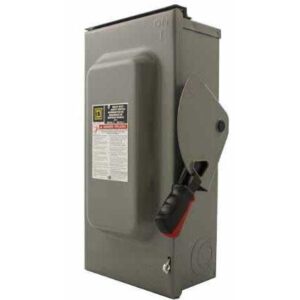
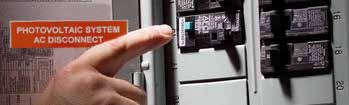
1. Locate your AC circuit breaker or AC disconnect.
AC Circuit Breaker (pictured above)
AC Disconnect (pictured above)
Breakers will usually be in your breaker panel. AC disconnects will be near your utility meter. Some systems will have both a circuit breaker and a disconnect. Some will only have a disconnect. if you have a breaker, make sure that it is not tripped. Let us know if it was tripped.
2. Turn off the breaker or AC disconnect switch. This switch turns off AC grid voltage going to the inverter.
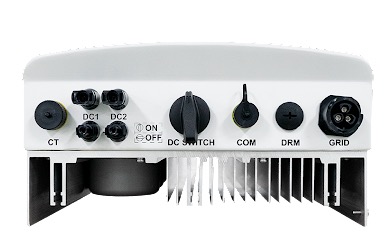
3. Locate the DC disconnect on the bottom left side of the inverter (shown below). Turn the DC disconnect off. It will make a positive click sound when it goes into the off or on position. This turns off DC voltage going to the inverter.
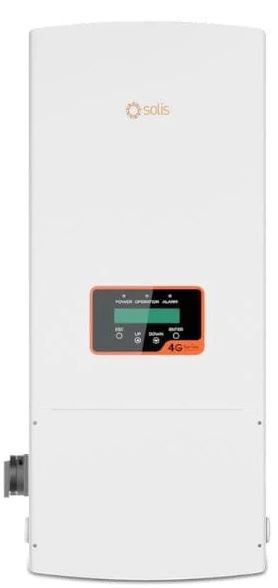
Front of Solis Inverter (pictured above)
Bottom of Solis inverter with DC disconnect switch (pictured above)
4. The inverter should now be off. Make sure that no lights are lit on the inverter now. If everything looks to be off, then wait 5 minutes.
5. After 5 minutes, reverse the process by turning the AC breaker/disconnect and the DC disconnect back on. At this point, the inverter should start to go through its boot-up sequence. After a 5-minute grid monitoring period, power productions should resume if the sun is out. The power and operation lights should be on and solid, indicating normal operations.
If the alarm light goes on, look for an error code on the screen of the inverter. Send us a picture the screen. This visual information helps us best diagnose your issue.
If you see proper operation again and can see power production on the screen taking place, you are finished with the power cycle.
Please let us know what you found out during the power cycling process, and we can assist you further
When there is a green light on your inverter but there is a “No Communications” alert on your online SolarEdge/mySolarEdge monitoring portal, please see the following guidance to help re-establish your internet connection:
Step 1: Confirm that the internet is working properly on your computer. If not, please contact your Internet Service Provider to help re-establish an internet connection.
Step 2: Confirm your inverter is properly connected to your router and that your router is properly connected to the internet. To do this, determine which of the following connections is applicable for your solar system setup and follow the provided guidance.
Step 3: If the problem persists, reset your internet router. If none of the above solutions seem to correct your inverter’s internet connection, reset your router: unplug the router from the wall outlet – wait 30 seconds – plug the router back in.
Have you changed Internet Service Providers (ISP) or installed a new router lately?
Step 1: Locate your Fronius inverter.
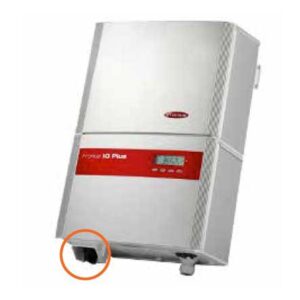
Step 2: Turn off the AC power.
 Note: If the solar circuit breaker is not labeled, look for a dual pull 40 AMP breaker toward the bottom of the main service panel that might look newer than the others. This is likely the solar breaker.
Step 3: Wait 5 minutes.
Leave the DC power completely off for 5 minutes. This will allow time for the capacitors in the inverter to discharge completely before proceeding to the next step.
Step 4: Turn on the AC power.
Flip the AC solar breaker back into the ON position. Make sure it matches the direction of the rest of the breakers in the main service panel.
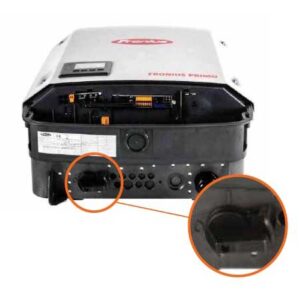
Step 5: Turn on the DC power.
Turn ON the DC disconnect switch on the bottom-left of your inverter by turning it toward the “I” position. You may hear clicking sounds as the inverters power back up – this is normal.
Step 6: Check inverter screen for activity.
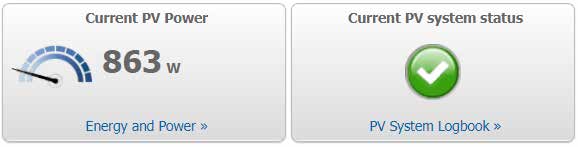
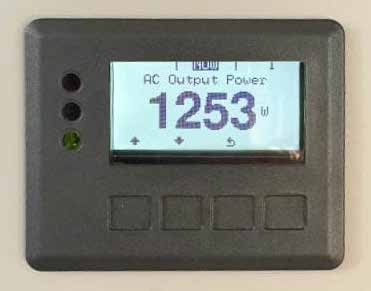
Under normal conditions, the inverter will display a “Start Up” or “AC Grid Timer” message on the screen for 5 minutes. After 5 minutes have elapsed, the inverter should be completely on and display a read-out of its real time production in watts.
If after 5 minutes, the screen displays a persistent State Code, please take note of the code and contact the Service Department for further assistance.
Step 1: Locate your Fronius inverter.
Step 2: Turn off the AC power.
Locate the AC Disconnect to turn off the AC power. The disconnect is often located outside near the meter. Pull the handle down, into the OFF position.
Step 3: Wait 5 minutes.
Leave the DC power completely off for 5 minutes. This will allow time for the capacitors in the inverter to discharge completely before proceeding to the next step.
Step 4: Turn on the AC power.
Lift the AC disconnect handle up into the ON position.
Step 5: Turn on the DC power.
Turn ON the DC disconnect switch on the bottom-left of your inverter by turning it toward the “I” position. You may hear clicking sounds as the inverters power back up – this is normal.
Step 6: Check inverter screen for activity.
Under normal conditions, the inverter will display a “Start Up” or “AC Grid Timer” message on the screen for 5 minutes. After 5 minutes have elapsed, the inverter should be completely on and display a read-out of its real time production in watts.
If after 5 minutes, the screen displays a persistent State Code, please take note of the code and contact the Service Department for further assistance.
When there is a green light on your inverter but there is a “No Communications” alert on your online Fronius portal, please see the following guidance to help re-establish your internet connection:
Step 1: Confirm that the internet is working properly on your computer. If not, please contact your Internet Service Provider to help re-establish an internet connection.
Step 2: Confirm your inverter is properly connected to your router and that your router is properly connected to the internet. To do this, determine which of the following connections is applicable for your solar system setup and follow the provided guidance.
Step 3: If the problem persists, reset your internet router. If none of the above solutions seem to correct your inverter’s internet connection, reset your router: unplug the router from the wall outlet – wait 30 seconds – plug the router back in.
Have you changed Internet Service Providers (ISP) or installed a new router lately?
A new federal law ends the 30% solar tax credit in 2025. Install now to maximize your savings before it’s too late!

Don’t miss the July 4th solar flexibility cutoff. Learn how to safe harbor your commercial project to secure the 30% tax credit and a 4-year construction window.

Is energy storage a smart move for your organization? Explore the benefits of solar batteries for business, from peak shaving to 2026 federal tax incentives.

![]()


![]()


Choose which non-necessary technologies may run on this site. Privacy Policy
Global Privacy Control is active. Marketing remains denied even if you accept all.